On the ThermoFunkies Club Members Facebook group someone asked me if I could convert a Wagon Wheel Slice recipe to be made in the Thermomix. Well I could hardly say no now could I?! This is a fairly close result to a commercial bought one!
Enjoy!
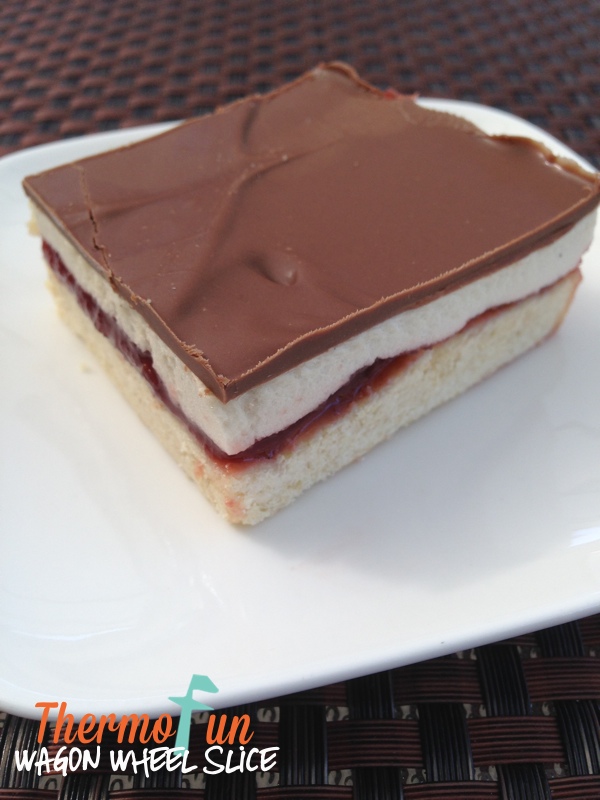
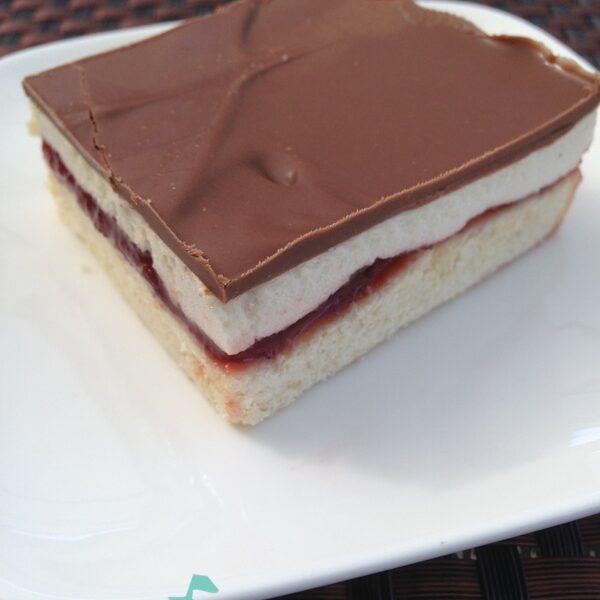
ThermoFun – Wicked Wednesday – Wagon Wheel Slice Recipe

Ingredients
Base:
- 60g butter, unsalted, cubed
- 60g caster sugar
- 1 egg
- 210g plain flour
- ¼ teaspoon baking powder
- pinch salt
Jam:
- 1 cup raspberry jam (approx.)
Marshmallow:
- 3 teaspoon gelatine powder
- ½ cup water
- 200g caster sugar
- 1 teaspoon ThermoFun Vanilla Bean Paste
Chocolate layer:
- 200g dark chocolate melts
- 20g coconut oil
Instructions
Base:
- Preheat oven to 180°C/160°C fan-forced. Grease a 3cm-deep, 16cm x 26cm slice tin. Line base and sides with baking paper, extending paper 2cm from edge on all sides.
- If using raw sugar for the caster sugar mill it at this point (while you have a dry clean bowl) and set aside.
- Place butter into TM bowl and melt 40 sec / 50°C / speed 4.
- Add sugar and egg and mix 30 sec / speed 4. Scrape down.
- Add flour, baking powder and salt and mix 10 sec / speed 4. Scrape down and repeat.
- Press mixture into prepared tin. Bake 15 mins or until golden.
Jam layer:
- Spread warm base with jam.
Marshmallow layer:
- Meanwhile, soak gelatine in ½ cup of water (approx. 10 mins).
- After gelatine has soaked, place into TM bowl with sugar and dissolve 3 mins / 60°C / speed 1.
- Continue dissolving 3 mins / 100°C / speed 1.
- Insert butterfly and whip 7 mins / speed 4.
- Add vanilla and mix 20 sec / speed 4.
NB: the mixture will still be runny but it will thicken and set in fridge. Pour onto jam layer and refrigerate 45 mins – 1 hour.
Top layer:
- Place chocolate and oil into TM bowl and grate 10 sec / speed 9. Scrape down and melt 3 mins / 50°C / speed 1.
- Scrape down and melt for a further 2 mins / 50°C / speed 1.
- Pour melted chocolate on top of slice.
- Refrigerate 30 mins or until set. Stand at room temperature for 10 mins before cutting.
To clean Thermomix bowl:
- Pour a glass of milk into TM bowl and mix 5 sec / speed 8.
- Heat milk 5 mins / 80°C / speed 4.
- Enjoy warm chocolate milk. No wasted chocolate!
Notes
To make it easier to cut this without it falling apart , I found it is easier to cut a strip about 5cm wide, then turn that strip on its side and cut it downwards into smaller pieces. Using a VERY sharp knife will also make it easier.
For other ThermoFun Wicked Wednesday recipes Click Here
Click Here for more great recipes in a number of e-cookbooks – containing recipes to suit everyone.
If you have enjoyed this recipe then please consider leaving a comment. It’s always refreshing to see comments from people that have tried a recipe and found it a success or tweaked it to suit.


Merryn says
Thank you I had forgotten about this recipe made when I first acquired my thermomix. Can you double it ti make a gift for a friwnd? Thank you Leonie
thermofun says
Merryn, I haven't doubled it but looking at the quantities I'm sure it would be fine. :)
Amanda says
Another amazing recipe! So so good!
thermofun says
Thank you Amanda :)
Bianca says
Made this for hubby to take to work for everyone for morning tea.. everyone enjoyed it and said it was better then store bought.. pretty happy with myself first time making it.. definitely making again in the future..
thermofun says
oh wow that's awesome to hear Bianca! Well done! :)
Monica Desteno says
I might try this with a gluten free flour blend recipe that I made.
thermofun says
I'd love to hear how you go Monica! :)
Sarah says
I made this on Friday, though it is really yummy the jam and marshmallow don't seem to like each other. They don't stick together and make the slice separate when picking up a piece. Is there a trick to getting it all stick together so it doesn't fall apart?
blanket girl says
Loved this slice..Tasted like good old wagon wheels, the only thing I did wrong (and completely my doing as the recipe instructions weren't properly followed) was that I didn't line the baking tray properly with the paper going up over on all sides, so some of the marshmallow ran underneath giving some of the slices a sticky bottom. (nobody likes a sticky bottom) but as I said that was my error I should have done what I was told. My marshmallow was perfect tho :-)
Gail Kirby says
Yay! So easy and yum! Didnt have a problem with the marshmallow not setting.
thermofun says
Pleased you enjoyed it Gail :)
Liz_M_ says
This took me back years to when I bought wagon wheels in Australia. We don't get them in NZ. I have a feeling this won't last long. Thanks for sharing.
lisa says
I followed instructions exactly but the marshmallow layer turned out like a thick jelly with a thin marshmallow top. Should it be whisked longer then 7 minutes? It was a thin white liquid when i poured it onto jam layer.
thermofun says
Lisa it should firm up more after it's been in the fridge for awhile. :)
lisa says
It was still the same after being in fridge for more then a day - a clear really firm jelly and thin white layer on top. :(
thermofun says
oh no Lisa :( I'm really sorry - I'm not sure what would've gone wrong. :(
L_Sylvester says
I made a batch using mini muffin tray and took to a work function. Devoured in seconds. Requests for more. Thanks for delightful recipe.
thermofun says
I love the mini muffin tray idea :)